PDF Takeoff Worked Example: Scale, Area, Length, and Count
Quick answer
A reliable PDF takeoff follows this order: confirm the sheet and revision, calibrate the current page, verify a second known dimension, trace area and length quantities, review any repeated-symbol candidates, inspect the Takeoff Worksheet, then export CSV or a PDF summary. The plan used here is plotted at 1/4 inch = 1 foot, or 18 PDF points per foot, and it carries 540.00 sq ft of floor finish, 30.00 ft of partition length, and 12 committed Supply diffuser counts across 14 records.
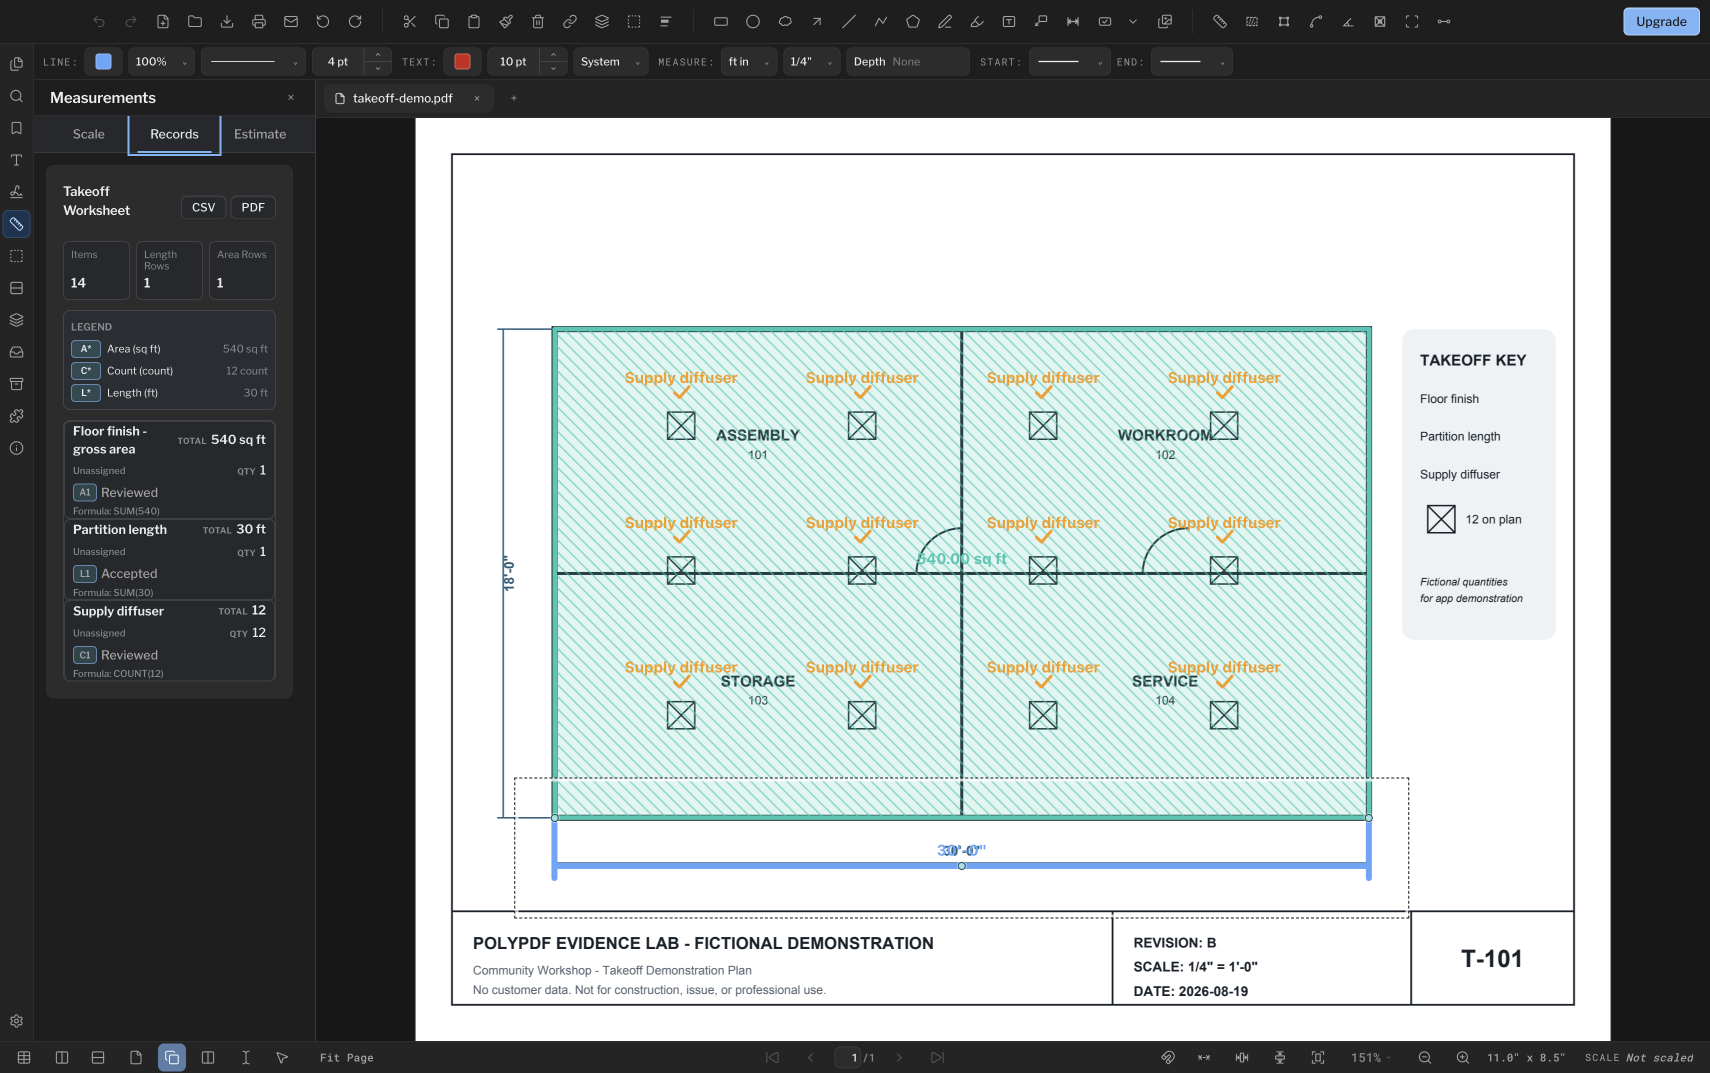
This worked example follows one small takeoff end to end: calibrate the page, trace an area and a length, count a repeated symbol, review the worksheet, export. The same sequence applies to your own drawing once you have verified its scale.
- Release review
- Aligned with PolyPDF 1.5.4 (build 26) on . Earlier walkthroughs and screenshots retain their versions below.
- Walkthrough verified
- Tested with
- PolyPDF 1.5.0 (build 22); screenshots from 1.4.0 (build 17)
- Platforms
- macOS and Windows
Work with the construction drawing set
Measure the Willow Creek architectural plan
A101 · A201
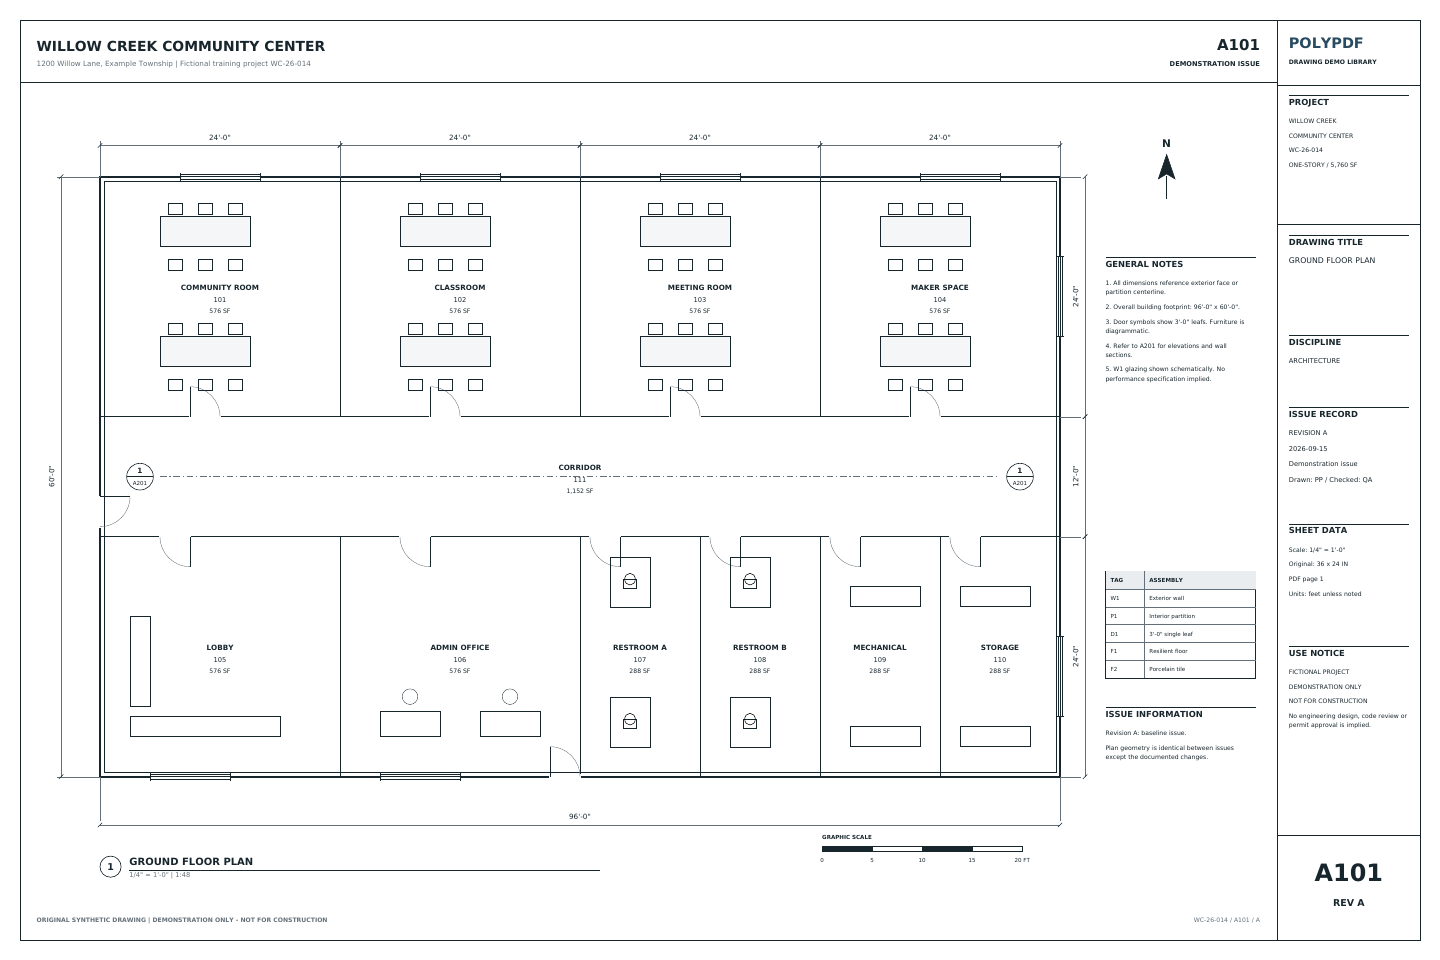
- Open A101, Revision A. Calibrate the printed 20 ft reference; it spans 360 PDF points.
- Check the independent 96 ft width and 60 ft depth, then trace the outside building boundary.
- Compare the gross area with 5,760 sq ft. Keep sheet, revision, subject, unit, and total with the exported record.
This is a gross footprint exercise. It does not measure net flooring or subtract walls. The two length checks and one area use three manual measurements.
Drawing reference values, not new app test results. Work on a copy and check your own saved output.
Inspect the saved Mac example and its tested local build →
Move checked quantities into the free Excel takeoff template →
 Download Revision A · PDF
The exercise above uses the Willow Creek library. Earlier walkthrough screenshots and saved examples below retain their original drawings, versions, and quantities.
Try calibration on the practice drawing
The separate F-101 exercise provides labeled dimensions, reference quantities, and two independent scale checks before a net-area measurement. Its drawing and scale differ from the historical screenshots in this guide.
Get the drawing and follow the three-measurement exerciseScroll through estimates in 1.5.4
The estimate workspace now scrolls vertically through rows and horizontally across columns, retaining its position while you edit values. Area cutouts also have aligned resize handles and can be moved by dragging inside the opening; review the resulting net quantity after changing its geometry.
Metric dimensions in 1.5.1
In PolyPDF 1.5.1, new metric dimensions default to millimetres. Existing documents retain their explicit display formats, and metric area and volume remain in square and cubic metres. Changing the displayed unit does not establish the page scale: verify a known dimension after any scale or unit change.
The sample and the takeoff question
The sheet is T-101, Revision B: a one-page community workshop plotted at 1/4 inch = 1 foot. One screen holds everything the example needs—a calibrated area, a partition length, a committed count series, the Records panel, and the Markup Table. Copy the workflow rather than the numbers; the quantities belong to this drawing.
- Area question: does the traced floor-finish boundary produce the displayed 540.00 sq ft?
- Length question: does the south partition run produce the displayed 30.00 ft?
- Count question: do the 12 committed markers and the worksheet total agree?
- Output question: can a reviewer see the items, totals, formula, pages, subject, and status before export?
Step 1: establish and check the page scale
This sheet is plotted at 1/4 inch = 1 foot. At 72 PDF points per inch, that preset corresponds to 18 PDF points per foot. Apply the printed architectural preset to the page, then verify it against the labeled 30-foot horizontal span or another independent dimension before relying on quantities.
72 PDF pt/in × 1/4 in/ft = 18 PDF pt/ft
Before adding quantities, draw a temporary measurement over a different labeled span. A second check is what catches a wrong endpoint, a mistyped distance, or an incorrect unit. For a scanned plan, also compare a reference in the other direction because a single proportional scale cannot correct unequal horizontal and vertical stretch.
The scale here is deliberately simple. Your plan may use an architectural, engineering, or metric preset, or need calibration from a dimension printed on the sheet.
Step 2: trace area and linear quantities
Choose Area and click around the floor boundary, using enough vertices to follow the intended face. Close the polygon at the starting point. The screenshot shows a rectangular 540.00 sq ft floor-finish area and a 30.00 ft south partition run. An area measurement reports the boundary you traced; whether that boundary means usable, rentable, finish, or code area is a judgment you make.
- Name the area’s Subject so its worksheet row explains what the polygon represents.
- Inspect the boundary at corners and openings. Add area cutouts when a void must be excluded rather than mentally subtracting it later.
- Use Line Measurement, Dimension, Path Length, or Perimeter according to the quantity. An open run and a closed perimeter answer different questions.
- Give unlike assemblies distinct Subjects. A wall, curb, cable tray, and pipe should not collapse into one length total merely because they share units.
- Use Status to distinguish accepted work from an item that still needs checking before export.
In the screenshot, the selected 30.00 ft partition-length record sits beside the 540.00 sq ft area record. Each one stays identifiable on the page and in the worksheet, carrying its own subject, status, unit, and formula.
Step 3: count repeated symbols with Symbol Search
For repeated symbols, open Symbol Search, draw a box tightly around one clean example, run the search, and review the candidates before accepting them as counts. A committed count series looks like the screenshot above: 12 Supply diffuser markers on the plan and a worksheet total of 12. Our symbol-count guide covers the search and candidate-review step, one candidate at a time.
- Choose a representative symbol with clear linework and little surrounding text.
- Keep the query box tight enough to describe the symbol, but include the features that distinguish it from nearby objects.
- Review each candidate overlay rather than treating the match count as an unquestionable total.
- Accept the reviewed matches so they become ordinary count records on the document.
- Set the Subject to the actual item, such as Supply Diffuser, instead of leaving unlike count series ambiguous.
Free includes calibration and up to three hand-created measurements per document. Symbol Search requires PolyPDF Pro in the current release and is separate from that manual-measurement allowance.
Step 4: review the Takeoff Worksheet
Open Measurements › Records after placing the quantities. PolyPDF builds worksheet rows from the measurements and counts in the document. Rows keep distinct workspace or space assignment, Subject, Status, quantity kind, unit, and count series separate so unlike work does not become one unexplained number.
| Field | Question to ask | Why it matters |
|---|---|---|
| Workspace / Space | Is the item assigned to the intended room, zone, or unassigned bucket? | Prevents totals from being attributed to the wrong work area |
| Subject | Does the label name the assembly or item? | Keeps different scopes from merging under a generic name |
| Status | Is the value accepted, pending, or rejected? | Makes unresolved review work visible |
| Qty and Total | Do the item count and aggregate agree with the page? | Catches duplicate or missing records |
| Formula | Can you trace the displayed SUM or COUNT to its components? | Provides a compact arithmetic audit trail |
| Unit | Are lengths, areas, volumes, angles, and counts separated? | Stops unlike quantities from being added |
Select suspicious rows and return to the page before exporting. The worksheet is a review surface, not a replacement for understanding what each traced boundary or accepted match represents.
Step 5: export a reviewable result
Use CSV when the next step is spreadsheet estimating, filtering, or joining quantities to a cost database. Use the PDF summary when a person needs a fixed, readable handoff. PolyPDF exports the worksheet as it stands, so the drawing, the scale, the boundaries, the subjects, and the accepted matches all need to be right before the export leaves your hands.
- Keep the source PDF revision with the export so a reviewer knows which drawing produced the quantities.
- Record assumptions such as gross versus net area, centerline versus face-of-wall length, and whether cutouts were included.
- Spot-check at least one row of each quantity kind against the annotated page.
- After a drawing revision, rerun the affected takeoff rather than silently carrying forward values from the old geometry.
This example demonstrates the software workflow, not a professional estimate or bid. The person preparing the takeoff remains responsible for source documents, scope interpretation, waste factors, assemblies, pricing, and review.
Frequently asked questions
What should I do first in a PDF takeoff?
Confirm the sheet and revision, calibrate the current page, and verify a different known dimension before tracing any quantities.
Can PolyPDF export a takeoff to CSV?
Yes. The Takeoff Worksheet exports CSV for downstream spreadsheet work and a PDF summary for a fixed review handoff.
Does Symbol Search accept every match automatically?
The workflow is designed for review: draw a query around one symbol, inspect the candidates, then accept the matches that should become counts.
Is the 540-square-foot value a recommendation for my project?
No. It is the floor-finish area measured on the sample plan used in this guide. Your own number depends on your drawing, its calibration, and the boundary you choose to trace.
Sources and further reading
Run the same sequence on your drawing
PolyPDF is a free download for macOS and Windows. Start with one verified page, create a small takeoff, and inspect the worksheet before deciding whether the full workflow fits your work.
Free with no trial timer: markup, review, calibration, 3 hand-created measurements per document, and Revision Package viewing. Symbol Search, plugins, and Revision Package changes or publishing require Pro.